
Mitchell Integration
How to configure Mitchell Repair Center Connect and set up EMS file import in EstVis Desktop Server.
EstVis imports estimates from Mitchell® and can integrate with Mitchell Repair Center Connect for assignments, status updates and photo export. All Mitchell-related integration settings are configured in the Desktop Server app on the computer that has access to Mitchell files and services.
Configure the EMS files directory (estimate files)
EstVis imports estimate files with the .EMS extension. To allow EstVis to import these files you must point Desktop Server to the folder where Mitchell exports EMS files (this can be a local folder or a network share).
-
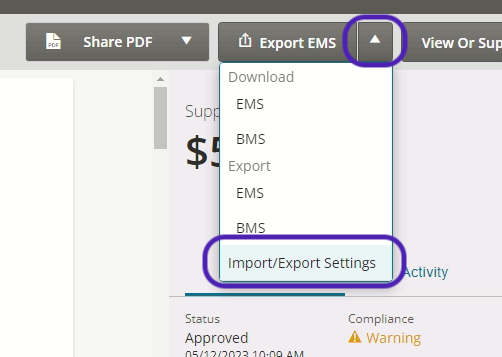
In Mitchell: open the Mitchell interface and expand the small menu ▾ to the right of the Export EMS button (be sure to click the ▾ to show the menu).
-
Choose Import/Export Settings.
-
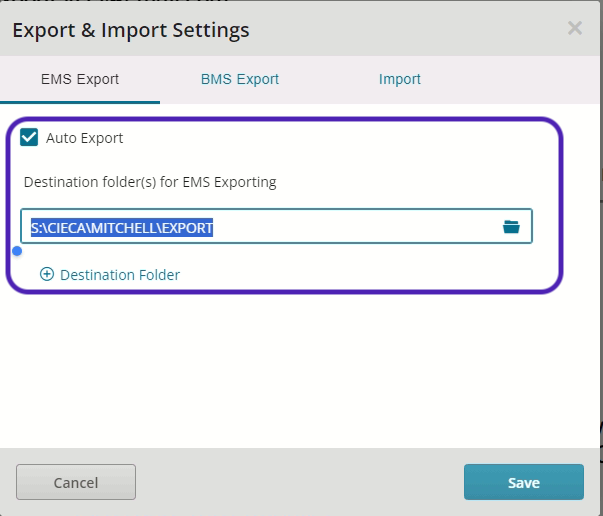
In the dialog that opens go to the EMS Export tab.
-
Ensure the Auto Export option is enabled.
-
In the Destination folder(s) for EMS Exporting field note or copy the path to the folder Mitchell uses to save EMS files.
Open Desktop Server settings
-
Launch the Desktop Server application on the machine that will perform Mitchell integration.
-
In the top-right corner of the Desktop Server window click the gear icon to open Settings.

-
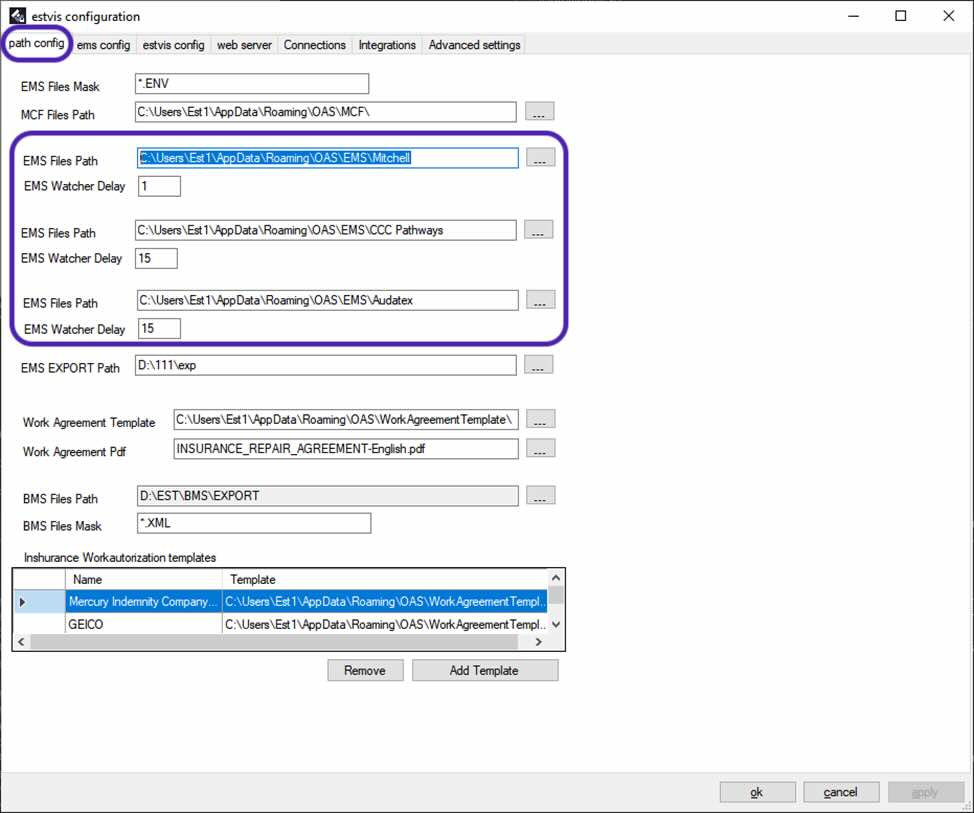
Switch to the Path Config tab.
-
Find the EMS Files Path field (ensure it is not already assigned to another integration such as CCC ONE) and paste the folder path you copied from Mitchell. You can also click the ... button to browse and select the folder manually.
-
(Optional) Set how often EstVis should scan the folder for new files by entering a value (in minutes) into EMS Watcher Delay.
Notes and best practices:
- Use UNC paths (\\server\share\path) for network folders rather than drive letters. Mapped drive letters may not be visible to Desktop Server if it runs under a different Windows account or service.
- Ensure the Windows account running Desktop Server has read access to the target folder. If Desktop Server runs as a service, that service account must have network permissions.
- Confirm Mitchell successfully exports EMS files into the configured folder before attempting import.
Configure Mitchell Repair Center Connect integration
-
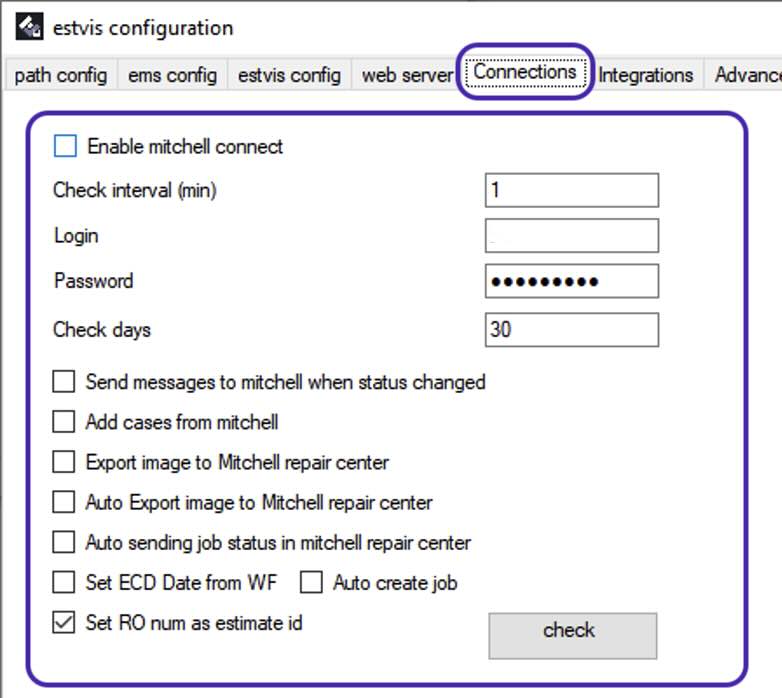
In Desktop Server settings open the Connections tab.
-
Find the Mitchell Integration group and enable the Enable Mitchell Connect checkbox.
-
Enter your Mitchell Repair Center Connect credentials in the Login and Password fields.
Your credentials are stored securely and are not transmitted elsewhere. -
Configure polling settings:
- Check Interval – how often (in minutes) EstVis polls Mitchell Connect for updates.
- Check Days – how many days back EstVis should check for new assignments.
-
(Optional) Configure additional integration options by enabling or disabling the checkboxes described below:
-
Send messages to Mitchell when status changed – when enabled, EstVis sends messages to Mitchell for case status changes. Messages are sent only for buckets (statuses) that have the SendMitchellMessage action enabled.
Learn more about automated actions on buckets in the Workflow setup: Buckets automated actions. -
Add cases from Mitchell – EstVis will create cases from Mitchell jobs when enabled.
-
Export images to Mitchell Repair Center – enables manual export of photo documentation to Mitchell.
-
Auto export images to Mitchell Repair Center – enable to export photos automatically when they become available.
-
Auto sending job status to Mitchell Repair Center – enable to send job status updates automatically.
-
Set ECD date from Workflow – when enabled, EstVis sends the ECD (estimated completion date) from the Workflow to Mitchell.
-
Auto create job – EstVis automatically creates a Job in Mitchell when a case is created.
-
Set RO number as estimate id – when enabled, the RO number in EstVis will be assigned the Mitchell estimate id.
-
Test the connection
On the Connections tab click the Check button. If settings and credentials are correct you should receive a success notification.
Troubleshooting tips if the check fails:
- Re-check your Login and Password for Mitchell Repair Center Connect and try again.
- Verify Desktop Server can reach Mitchell services (internet access and no outbound firewall blocking).
- If EMS import does not work, confirm EMS files appear in the configured folder and that Desktop Server has read permission for that folder (use UNC path for network locations).
- If Desktop Server runs as a Windows service, ensure the service account has network share access.
- Review Desktop Server logs for specific error messages and include them when contacting support.
If you cannot resolve the issue, contact EstVis support at support@estvis.com and provide:
- A short description of the problem
- Desktop Server settings screenshots (Paths and Connections tabs)
- Any error text from the Check result or Desktop Server logs